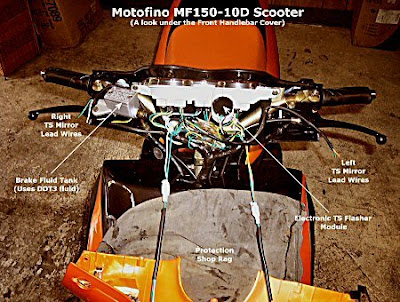
 Removing the Front Handlebar Cover is necessary to replace brake fluid, the flasher module, or one of the in-cover front turn signal lamps. Other than those items there is no reason to go into it. (If you were trying to get to the horn, it is under the front headlight panel.)
To remove the cover, First remove both mirrors held on with 6mm screw bolt screws using the wrench in the tool kit. Watch it you do not lose the lockwasher sets. Work inside when you take things apart, and have a magnetic pick up wand handy to retrieve dropped hardware. When removing the mirrors, you have to disconnect the orange-green wires connected with wire push-snaps on the left mirror, and light-blue green wires on the right mirror. These connections power the LED flashers in the mirrors. These wires have formed brass connector snaps that simply pull apart, and snap together to re-connect. There is an insulated snap on each mirror wire lead. Fish them out of the side of of the lever recesses to gain access.You will need to remove the front handle part end cover pieces too, which held in place by a single screw at the ends under the cover.
Next remove two screws at the top of the instrument panel, two underneath it, and two at the sides, plus a long screw directly under the cover in the center. This particular screw should be lubricated before you attempt to put it back in.
If you are in here to replace the flasher module, it has a 3-pin snap type connector holding it together. Simply pry aside the snap lever first and pull the connector plugs apart. Now remove the old flasher module from the holder. It just slides out of the circular bracket.
Now you can insert the replacement flasher in the holder, and snap the 3 pin male-female connectors back together. You just push the connectors together unitil it snaps and locks. You cannot mess this up. They are keyed to connect only one way.
If you are replacing DOT 3 brake fluid, or just replacing a little, know that the level should be up to with 1/8 inch of the top reseviour tank lip. To open the tank, you must remove two Phillips head screws on the tank top. These screws are in very tight, and if you strip the screw heads you have caused yourself a big problem! Better to make sure you are using a Phillips head tip (#2) Screwdriver that is in good shape, and meets the screw heads firmly. In other words, a perfect fit.
Some people press down very hard on the screw as they try to back it out. That works, if you don't slip. A sure way to not strip a screw head is to use and impact screwdriver and tap it loose with a light mallet first, then switch to a plain Phillips head screwdriver that fits well to back the screw out.
It never hurts to spray the screw recesses first with Blaster, or other penetrating oil and let it stand a few minutes first.
Anything you are in here for is pretty easy if you proceed carefully.Lamp-sockets twist out of their slots so you can replace bulbs. Grasp and twist counter-clockwise, lift out, to remove a lamp holder.
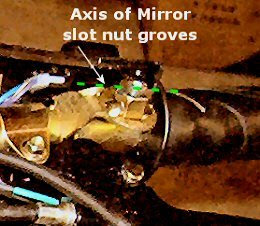
What may not be easy is replacing the mirrors back on the front cover and routing the mirror lead wires so they are not crushed! Special attention is required! When you replace the mirrors, please be sure that when you tighten down the screwbolts on the mirror mounts you align the protrusion slots in the mirror base with the groves shown as a green dotted line in the AXIS photo at the top of this article. Be very sure none of the leads get between the mirror base and the mount handlebar screw plate. Route the wires in the groves in the mount slot plate. If these mirror wires are crushed in the tightening process your mirror flashers will not work. You may also short the flasher out in the process and have to replace it.
